Lapbooks
When I first heard of lapbooks, I thought they would be labor-intensive and overwhelming. However, I have found that lap books are fun and easy to use. They have quickly become one of my family's favorite learning tools.
Lapbooking is a hands-on learning activity that places information about a science, history or literature topic into a file folder full of little books known as "mini books".
Lapbooks are portable, easy to store records of information that students can show to friends and family members or use as tools for review. Although they are enjoyed by children of all ages and learning styles, lap books are especially beneficial for kinesthetic and visual learners, who receive and process information by doing or seeing.
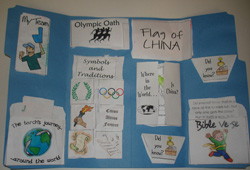
Here is a lapbook my 4 year-old created during our study of the 2008 Summer Olympics:
Creating Lap Books
To create a lapbook, all you need is a topic to study, a file folder, paper, a stapler, a hole punch, scissors, tape or glue, and your preferred writing tools.
Begin by choosing a topic of study. Break that topic down into subtopics, and assign each subtopic a minibook. You can find photographs, instructions and free templates for making shutter books, flap books, matchbooks and other types of minibooks at Notebooking Pages.
We kept our first lapbook simple by printing all of our templates on white paper, and using minibooks that were easy to cut out and assemble. You can spice up your lapbook by using various colors of paper and a variety of minibooks. You can also include photographs, drawings, charts and graphs in your lap book.
I generally print templates for all of our minibooks before we begin our study. I then have my children cut out and assemble one minibook every day or two, and affix them to their file folders at the end of our study.
Once you have completed your minibooks, assemble your lapbook by folding a standard sized file folder as shown in the video below. Glue your minibooks and other inserts inside, and voila - you've just created a lapbook!
Mini Office
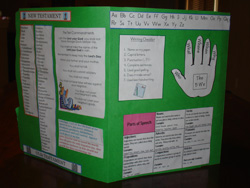
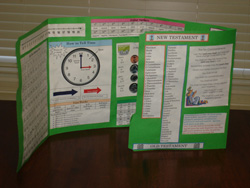
A mini office is a variation of a lapbook that can be used as a reference tool for students or a tool for review. I made a mini office to help my children with essential math and language concepts during our morning review period.
Here are a few pictures of my 7 year-old's mini office.
|
|
Lapbooking Resources
Research and planning are the most time-consuming aspect of lapbooking. However, there are many pre-planned lapbooks that you can obtain inexpensively or for free.
One of my favorite sources of lapbooks is Homeschool Share, a website that contains free unit studies and lapbook templates that are written by other homeschoolers. Follow this link to read reviews of Homeschool Share.
Hands of a Child sells affordable project packs that contain a research guide and hands-on activities for your lapbooks. You can purchase these packs in spiral bound, CD or e-book format. Follow this link to read reviews of Hands of a Child. Follow this link to read a transcript of my interview with Hands of a Child's co-owner, Niki McNeil.
Five in a Row, Live and Learn Press and Knowledge Box Central also sell lapbooking materials.
You can find more information about my family's lapbooking adventures on my homeschool blog.
Claim Your Free Copy of
101 Ways to Save Money on Homeschooling!
Enter your name and e-mail address below to receive a FREE copy of 101 Ways to Save Money on Homeschooling!
You'll also join over 5,000 homeschoolers in receiving our free, monthly newsletter full of tips and ideas for Successful Homeschooling.
 |